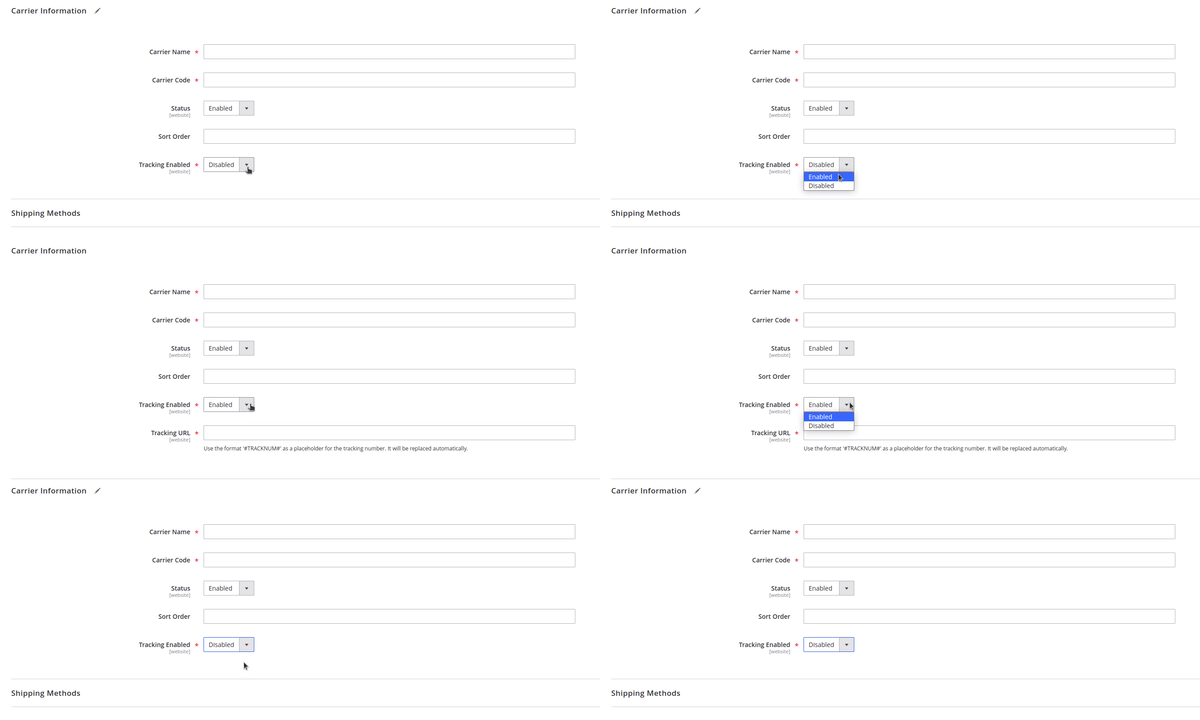
Hello Devs, In this tutorial we are going to explore Magento 2 UI components and we will see how we can Show/Hide one field based on another field in UI Component forms in Magento 2.
We often face the requirement of having a field dependent on the value of another field in our UI form.
switcherConfig is used to define rules on how we can handle different actions on a target ui element, based on the values of another element. The action callback can be anything.
In short, We can use it to hide/show field based on another field value in Magento 2 forms inside the ui component with some rules and actions based on these rules.
All form element ui components that extend Magento_Ui/js/form/element/abstract.js have a switcherConfig setting available for purposes such as hiding/showing elements as well as other actions.
If you wan to explore the switcher component can be found at Magento_Ui/js/form/switcher.
You can find examples of it being used in below files :
Let’s try one example and see how we can implement it in out custom form which is being rendered by custom UI component.
Scenario :
Let’s say you have created a new entity in Magento called a Shipping Carrier, and you have created a view in admin to edit these Shipping Carriers.
While editing a Shipping Carrier, we want the ability to enable Tracking for some carriers, and if Tracking is enabled we want to provide a Tracking URL. We will create two fields for this:
- Tracking Enabled (
tracking_enabled) - Tracking URL (
tracking_url)
To make things cleaner for the content editors, we will hide the Tracking URL field unless Tracking Enabled is set to Enabled (yes this is redundant, but naming is the hardest part of being a developer, right?).

You should have a file in your module like
Namespace/ModuleName/view/adminhtml/ui_component/shipping_carrier_form.xml.
This file will change depending on what type of entity you are working on, and the name of the UI Component form you created.
<?xml version="1.0" encoding="UTF-8"?>
<form xmlns:xsi="http://www.w3.org/2001/XMLSchema-instance" xsi:noNamespaceSchemaLocation="urn:magento:module:Magento_Ui:etc/ui_configuration.xsd">
  ...
  <fieldset name="carrier_information" sortOrder="10">
    ...
    <field name="tracking_enabled" formElement="select">
      <argument name="data" xsi:type="array">
        ...
      </argument>
      <settings>
        <validation>
          <rule name="required-entry" xsi:type="boolean">true</rule>
        </validation>
        <dataType>number</dataType>
        <label translate="true">Tracking Enabled</label>
        <scopeLabel>[WEBSITE]</scopeLabel>
        <visible>true</visible>
        <dataScope>tracking_enabled</dataScope>
        <!-- Add Your Condition Here -->
        <switcherConfig>
          <rules>
            <rule name="0">
              <value>0</value>
              <actions>
                <action name="0">
                  <target>shipping_carrier_form.shipping_carrier_form.carrier_information.tracking_url</target>
                  <callback>hide</callback>
                </action>
              </actions>
            </rule>
            <rule name="1">
              <value>1</value>
              <actions>
                <action name="0">
                  <target>shipping_carrier_form.shipping_carrier_form.carrier_information.tracking_url</target>
                  <callback>show</callback>
                </action>
              </actions>
            </rule>
          </rules>
          <enabled>true</enabled>
        </switcherConfig>
        <!-- Add Your Condition Here -->
      </settings>
      <formElements>
        <select>
          <settings>
            <options>
              <option name="0" xsi:type="array">
                <item name="value" xsi:type="number">1</item>
                <item name="label" xsi:type="string" translate="true">Enabled</item>
              </option>
              <option name="1" xsi:type="array">
                <item name="value" xsi:type="number">0</item>
                <item name="label" xsi:type="string" translate="true">Disabled</item>
              </option>
            </options>
          </settings>
        </select>
      </formElements>
    </field>
    <field name="tracking_url" formElement="input">
      <argument name="data" xsi:type="array">
        ...
      </argument>
      <settings>
        <validation>
          <rule name="required-entry" xsi:type="boolean">true</rule>
        </validation>
        <dataType>text</dataType>
        <label translate="true">Tracking URL</label>
        <scopeLabel>[WEBSITE]</scopeLabel>
        <visible>true</visible>
        <dataScope>tracking_url</dataScope>
      </settings>
    </field>
  </fieldset>
</form>
So in the above example, we have added the two fields always visible and always required for Shipping Carriers.
But we want to hide the Tracking URL field unless Tracking is Enabled. So we have added <switcherConfig> inside the <settings> the node of our field “tracking_enabled”.
Now the Tracking URL field will be hidden unless the Tracking Enabled field is set to Enabled. It will also only be required if it is visible. But let’s break down what we just added so we can understand what it does.
The <switcherConfig> component contains an array of rules which is what we’re building out here. Each <rule> has a name which is a number in this example. This name is the array index for this item. As these are arrays, they should start with 0, not strings or 1.
Inside each <rule> We pass two arguments.
<value>– This is the value oftracking_enabledwhich should trigger the actions defined below.<actions>– Here we have another array. These are the actions to be triggered when this rule’s conditions are met. Again, eachaction‘s name is just the array index of that item.
Now each <action> has two arguments as well (with an optional 3rd).
<target>– This is the element you wish to manipulate under this action. It’s basically something like{component_name}.{component_name}.{fieldset_name}.{field_name}in this example.<callback>– Here is the action to be taken on the above-mentioned target. This callback should be a JavaScript function that is available on the element targeted. Our example uses hide and show. This is where you can start to expand on the functionality available. The catalog_rule_form.xml the example I mentioned earlier usedsetValidationif you wish to see a different example.- You can also add
<params>to any<action>that calls for them. You can see this in thecatalog_rule_form.xmlexample as well.
Finally, the last item inside <switcherConfig> is <enabled>true</enabled>. This should be pretty straight forward, it’s a Boolean to enable/disable the switcher functionality we just implemented.
To see the changes you may need to clear the cache if you have it enabled.
You may also like :
How to Remove Blocks or Containers From Layout in Magento 2?
How to remove blocks programmatically in Magento 2?
That’s it for this tutorial, See you in the next blog. Happy Coding 🙂


Great job! Straight to the point and kept it Magento 2.
Thanks LeoEff