If you’re building a headless storefront, mobile app, or just exploring Magento 2’s modern capabilities, GraphQL authentication is a must-know topic. In this tutorial, I’ll show you how to generate a customer access token using GraphQL in Magento 2.
This token is essential for making authenticated requests on behalf of the logged-in customer (like fetching their orders, addresses, wishlist, etc.).
Prerequisites
Before you start, make sure:
- Magento 2.3 or higher is installed (GraphQL is supported natively from 2.3+)
- GraphQL is enabled (default in Magento)
- You have a customer account created in Magento
- A tool to test GraphQL requests like:
- Altair GraphQL Client
- Postman
- Magento’s built-in
/graphqlendpoint
Why Do You Need a Customer Token?
Magento uses OAuth-based access control for APIs. Instead of using session-based logins, GraphQL returns an access token when the customer logs in via their credentials. This token can be sent with future requests for secure access to customer-specific resources.
GraphQL Mutation for Generate Customer Token
To generate a token, use the generateCustomerToken mutation.
Mutation Syntax
mutation {
  generateCustomerToken(
    email: String!
    password: String!
  ) {
    token
  }
}
Replace the email and password with your registered customer’s credentials.
Example (Request Body)
mutation {
  generateCustomerToken(
    email: "roni_cost@example.com"
    password: "roni_cost3@example.com"
  ) {
    token
  }
}
Response (Output)
{
  "data": {
    "generateCustomerToken": {
      "token": "eyJraWQiOiIxIiwiYWxnIjoiSFMyNTYifQ.eyJ1aWQiOjEsInV0eXBpZCI6MywiaWF0IjoxNzQ5Mzk3MjQ4LCJleHAiOjE3NDk0MDA4NDh9.RP05hYN_0YiGtrdXkF88MP0USc4qA3hSm0p-Zz4ZveQ"
    }
  }
}
The returned token is what you’ll use to make authenticated API calls as the customer.

How to Use the Token?
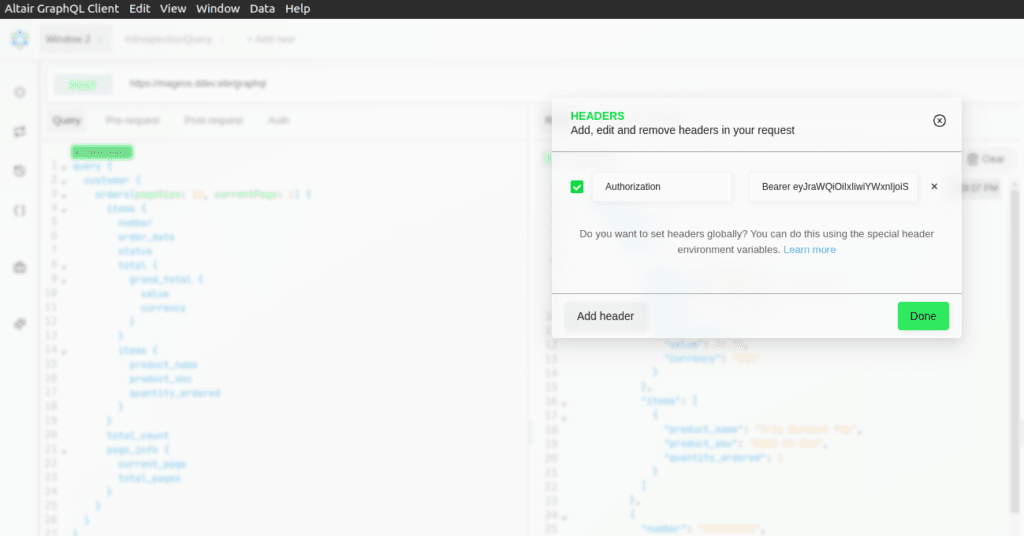
You can add the token as a bearer token in the Authorization header for your future GraphQL queries.
Example Header
Authorization: Bearer 6o3y6xyksoi2av5fejhe7z24ljv7u3z1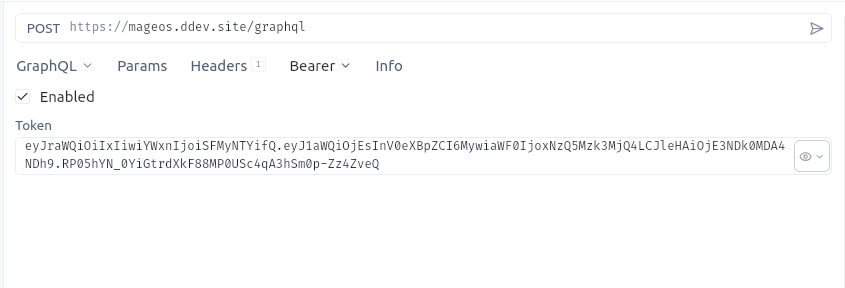
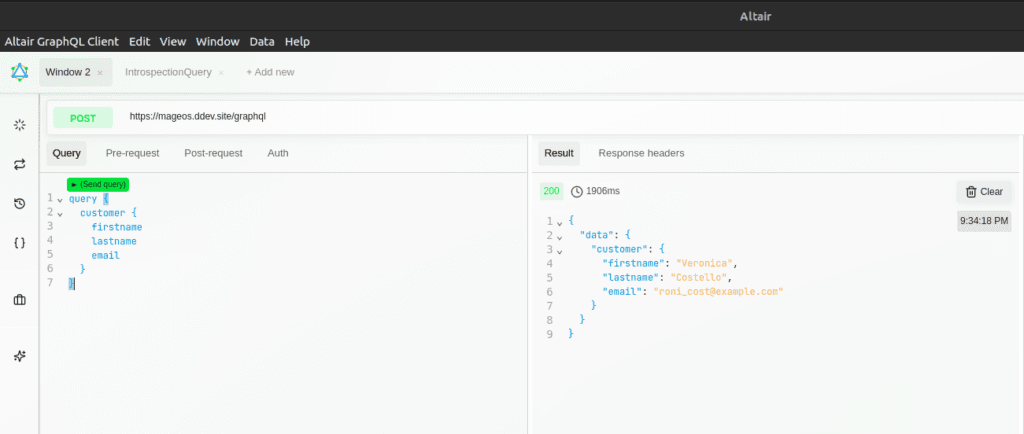
Example Authenticated Query (Fetch Customer Info)
query {
  customer {
    firstname
    lastname
    email
  }
}
Sample Output
{
  "data": {
    "customer": {
      "firstname": "Veronica",
      "lastname": "Costello",
      "email": "roni_cost@example.com"
    }
  }
}
Magento 2’s GraphQL customer token is a powerful tool for secure and modern customer authentication. Whether you’re building an app, SPA, or just exploring APIs — this mutation is your gateway to personalized commerce.
If you’re new to GraphQL in Magento 2, this is one of the first steps you should learn. Master it and you’re well on your way to building powerful frontend experiences!
We will see other useful Magento 2 Default GraphQL endpoints in upcoming blogs.
Frequently Asked Questions
A customer token in Magento 2 is a secure JSON Web Token (JWT) generated after a customer successfully logs in via GraphQL. This token is used to authenticate the customer for subsequent API requests.
GraphQL provides a modern and flexible API, allowing you to fetch exactly the data you need. It’s ideal for headless storefronts, SPAs, and mobile apps that require efficient and secure authentication.
Use the generateCustomerToken mutation with the customer’s email and password.
Send your GraphQL request to the /graphql endpoint of your Magento 2 store, e.g.:https://your-magento-site.com/graphql
By default, a customer token is valid for 1 hour. This duration can be configured from the Magento admin panel.
Magento 2 does not provide a refresh token mechanism for customer tokens out-of-the-box. After expiration, you must re-authenticate (login again) to obtain a new token.
Yes, as long as you use HTTPS to encrypt communication and securely store tokens on the client side, customer tokens are safe for production use.
For customer-specific queries or mutations, include the token in the Authorization header:Authorization: Bearer <customer-token>
No, customer tokens are only valid for customer-level GraphQL operations. For admin API access, use an admin token.
Yes, you can configure the token lifetime in the Magento admin:
Go to Stores > Settings > Configuration > Services > OAuth > Access Token Expiration.


Leave a Comment